Setting Up a Webhook
This guide walks through registering a webhook in the HealthEx Admin console, storing the signing secret, and confirming that a test event reaches your endpoint.
Webhooks are managed entirely in the Admin console. There is no public API for creating or editing them.
The Webhooks tab is only visible to users with the Org Admin permission. If you don't see it, the tab is hidden rather than disabled — ask an administrator in your organization to grant the permission or to create the webhook for you.
1. Open the Webhooks tab
Log in to HealthEx and navigate to the Admin tab in the top navigation bar, then choose the Webhooks tab. It's the last tab in the row, after API keys.
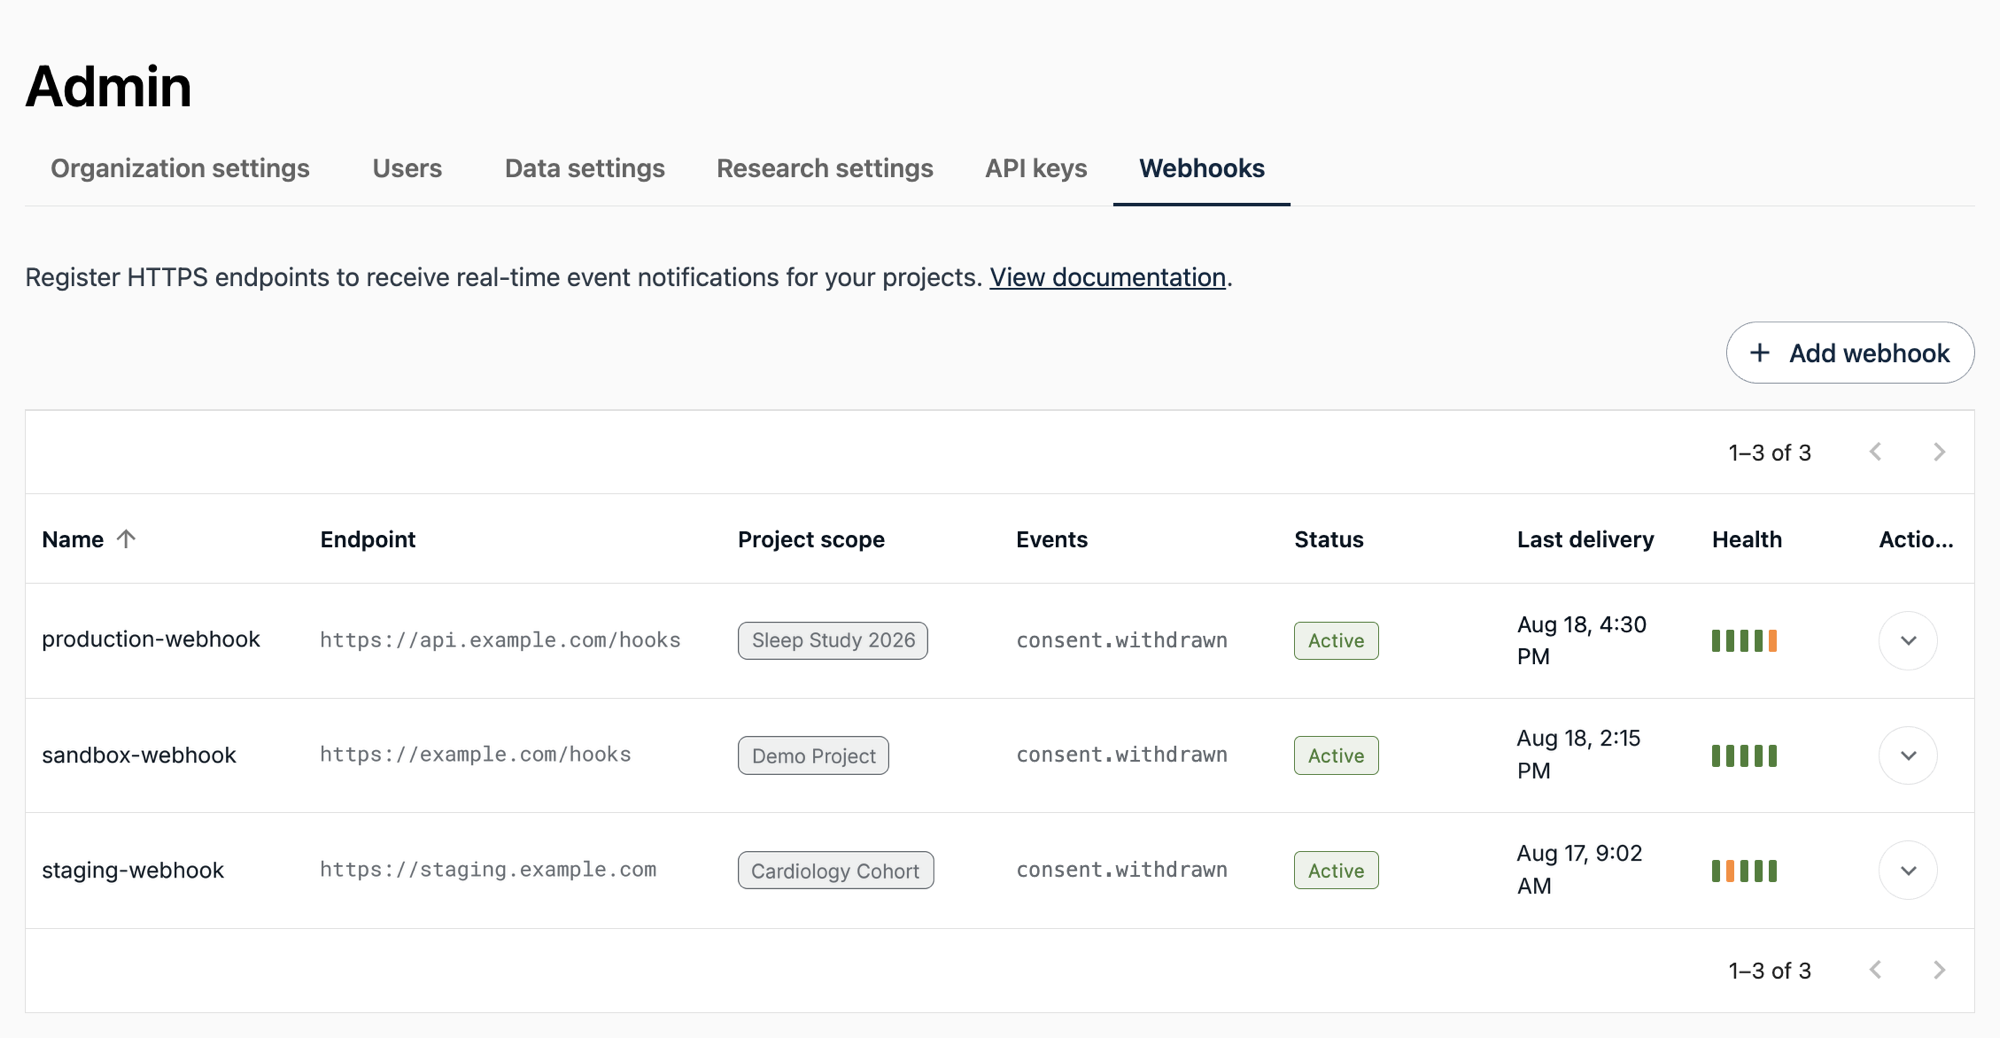
If you haven't created one yet, you'll see an empty state with an Add webhook button.
2. Add a webhook
Click Add webhook. Fill in the form:
- Name — a label for your own reference, such as
Prod consent handler. It is not sent to your endpoint. - Endpoint URL — the HTTPS URL we will
POSTto, for examplehttps://api.example.com/webhooks/healthex. Validated when you submit. - Project scope — choose one of three options:
- Single project — receive events for one project only.
- Multiple projects — receive events for a set of projects you choose.
- All projects (org-wide) — receive events for every current and future project in this organization.
- Events — tick the event types this endpoint should receive.
consent.withdrawnis selected by default. - Leave Send a test event after creation ticked. It's on by default and is the fastest way to confirm your endpoint works.
- Click Create webhook.
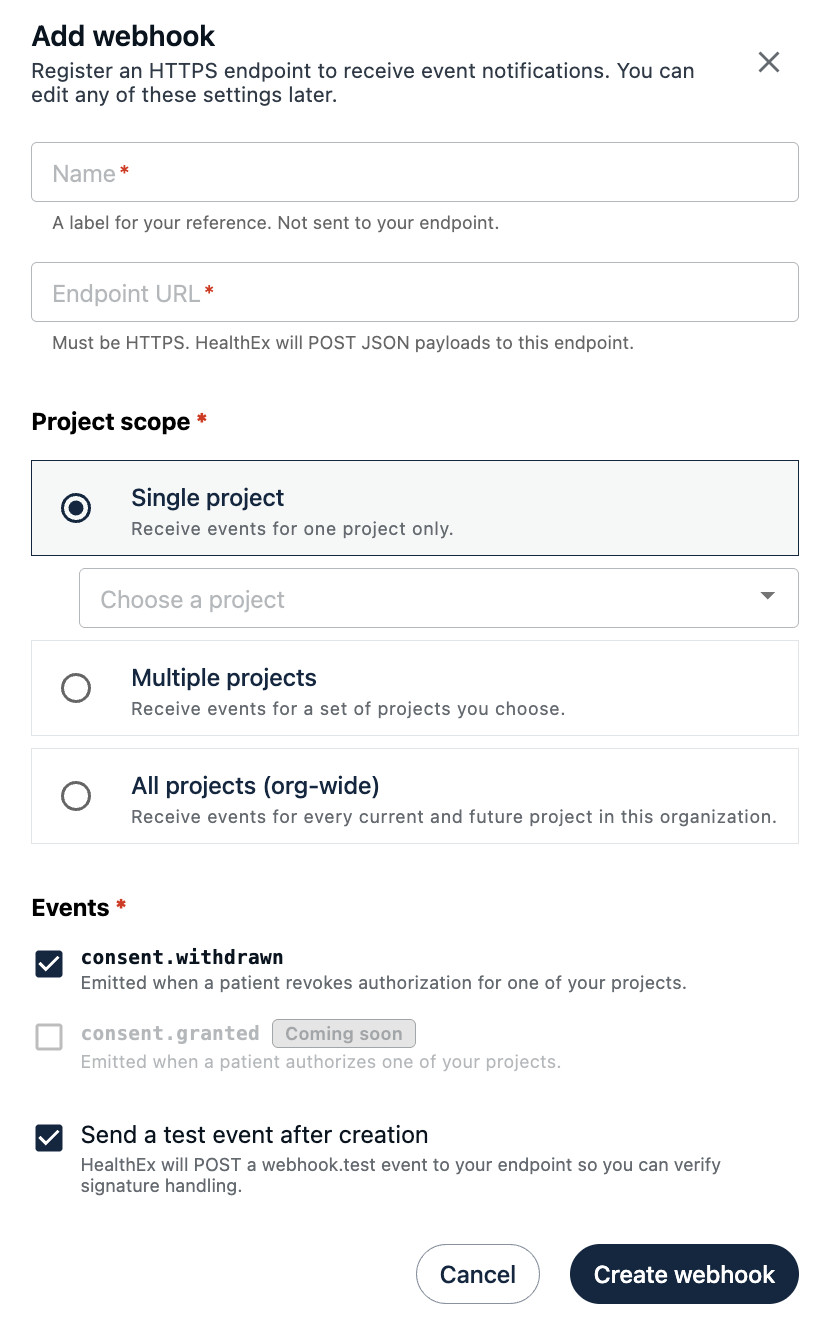
Only active projects appear in the project pickers. If a project you expect is missing, check that it's active and that your account has access to it.
The endpoint must use https, with one exception: http://localhost is accepted so you can point a webhook at a local receiver while developing. Any other http URL is rejected with Endpoint must be a valid HTTPS URL. Note that HealthEx cannot reach localhost from our infrastructure — use this only against a locally-running HealthEx environment.
3. Store your signing secret
On success, a dialog appears titled Webhook created — save your signing secret. Click anywhere on the Signing secret field to copy it — the whole field is the copy control, so there's no separate button to look for. Paste it into your secrets manager now.
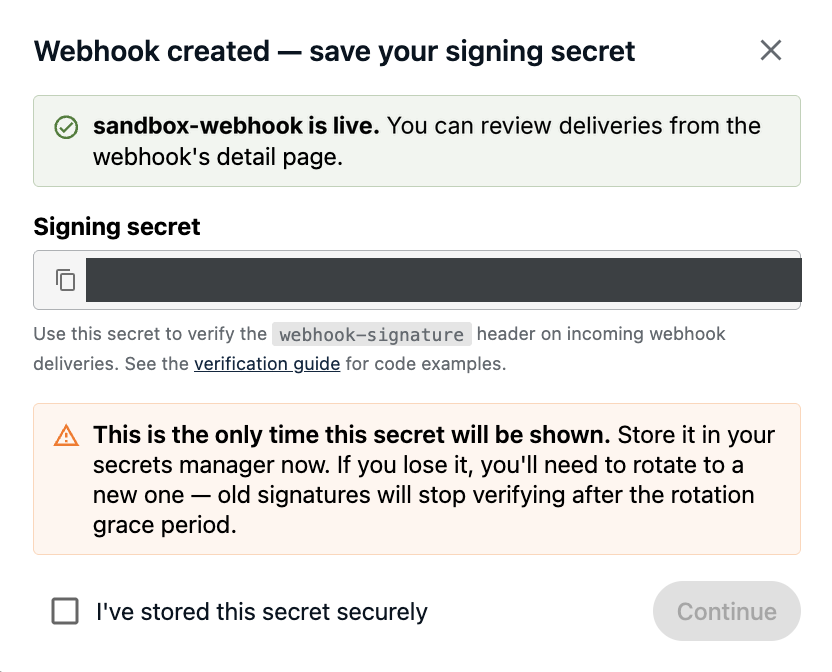
Tick I've stored this secret securely, then click Continue.
This is the only time this secret is shown. Afterwards the console displays only its last four characters. If you lose it, it cannot be recovered — you'll have to rotate to a new one and redeploy.
The checkbox is not a safety net. Dismissing the dialog with the × or by clicking outside it discards the secret just as permanently.
4. Confirm the test event arrived
If you left Send a test event after creation ticked, we've already sent a webhook.test event to your endpoint. It uses the same envelope, headers, and signature as a production event, which makes it the right payload to validate your verification code against.
{
  "type": "webhook.test",
  "timestamp": "2026-08-19T14:30:00.000Z",
  "apiVersion": 1,
  "deliveryAttempt": 1,
  "organizationId": "56696fdb-2e0d",
  "projectId": "test-project-id",
  "data": {
    "nonce": "b6f1c0e2-8d3a-4f57-9c11-2e7a5b8d4f63"
  }
}
Two things to know about test events:
projectIdis the literal stringtest-project-id, not one of your real project IDs. Don't let a strictprojectIdcheck reject it.datacontains a single randomnonce. Echoing it in your own logs is a convenient way to match a delivery you received against the one you triggered.
The confirmation you see in the console reports that the event was queued. It does not mean your endpoint answered. Confirm receipt at your endpoint, or check the delivery log for the actual response we got back.
5. Send more test events
You can send a test event at any time from Send test event, available both on the webhook's detail page and in the row menu on the list view.
Test events are delivered even when a webhook is paused, and even if webhook.test isn't in its subscribed events — so this stays available as a diagnostic when a webhook has been paused automatically.
6. Pause, resume, or delete a webhook
Each webhook's row menu and detail page offer an action whose label depends on the current status:
| Status | Action | Effect |
|---|---|---|
| Active | Pause | Stops deliveries, keeps the webhook and its configuration. |
| Paused (manual) | Resume | Returns the webhook to Active. |
| Paused (auto) | Re-enable | Returns the webhook to Active after HealthEx paused it automatically. |
Pausing takes effect immediately, with no confirmation prompt and no success message — the status chip changing is your only confirmation.
Events that occur while a webhook is paused are dropped, not queued. There is no backfill when you resume, and no way to recover them afterwards. A pause is a way to stop deliveries permanently for that window, not to defer them.
If you need to stop deliveries temporarily without losing events, take your endpoint offline instead and let our retry schedule hold them for you — that covers roughly 33 hours.
Delete removes the webhook permanently. Any deliveries still in flight for it will fail.
Managing Your Webhooks
The list view shows every webhook in your organization:
| Column | Content |
|---|---|
| Name | The label you gave it. |
| Endpoint | The registered HTTPS URL. |
| Project scope | All projects, or the project name — with +N more where several are selected. |
| Events | The subscribed event types. |
| Status | Active, Paused (manual), or Paused (auto). |
| Last delivery | When we last attempted a delivery. Blank until the first attempt. |
| Health | The outcomes of the last five attempts, most recent on the left. Green delivered, amber will be retried, red failed. |
| Actions | Per-webhook menu: view details, view the delivery log, rotate the secret, send a test event, pause or resume, and delete. |
Health is a five-attempt summary, drawn only from deliveries still inside the 30-day log retention window. For the individual attempts behind it — payloads, responses, and replay — open the webhook and select the Delivery log tab, described in Troubleshooting.
You can register more than one webhook against the same project, and more than one against the same URL. Each is scoped, signed, and retried independently.
Next Steps
- Verifying Signatures: Validate the test event you just received
- The
consent.withdrawnEvent: The payload you'll receive in production - Idempotency and Ordering: Make your handler safe against duplicates